Safety First When Relighting Your Pilot Light
When it comes to relighting the pilot light on your gas water heater, safety should always be the top priority. Before attempting to relight the pilot, it is crucial to check for any smell of gas in the area.
Make sure there are no open flames, sparks or other ignition sources nearby. Open a window to allow quick dissipation of any residual gas that may still be present.
Once you are certain all gas has cleared, locate the gas control valve and turn the knob to the 'Pilot’ position. If your heater has an electronic ignition, you will be able to push the igniter button to light the pilot.
Refer to the water heater’s manual if you are unsure of the valve’s location. For a manual ignition, use a long lighter or electronic lighter wand. Do exercise extreme caution when introducing any flame source to relight pilot.
After the pilot light is stable, keep the gas control knob depressed for at least 90 seconds. This allows time for the thermocouple or flame sensor to adequately heat up. Finally, adjust the knob to the desired hot water temperature setting.
Test that the pilot remains lit after releasing the knob. Replace any access panels securely.
By diligently adhering to proper safety protocol, you can avoid any dangerous gas issues when relighting your water heater’s pilot.
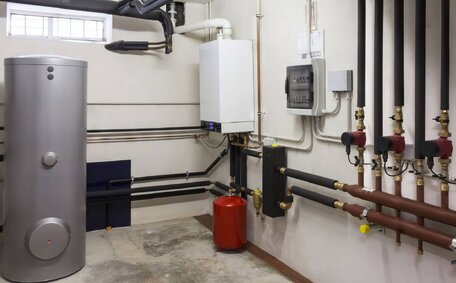
Locating the Pilot Light Assembly
The pilot light assembly is typically located at the base of the water heater near the main gas burner. To access it, remove the front lower panel or access door. This will expose the gas control valve and thermocouple. The small pilot light nozzle and igniter electrode will be mounted next to these components.
On newer electronic ignition water heaters, you may see a separate igniter button near the gas control valve to manually light the pilot. Older units have the igniter electrode built into the pilot light nozzle instead.
Visually inspect the pilot light assembly before attempting to relight it. Visually inspect the pilot light assembly before attempting to relight it. Use a flashlight to locate the electrode tip and ensure it is not damaged.
Proper inspection helps guarantee smooth relighting.
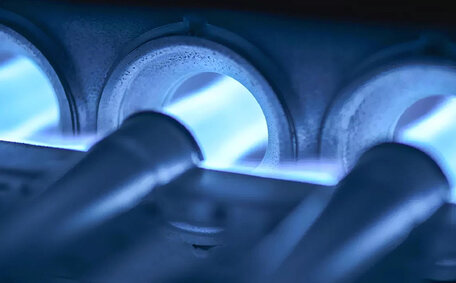
How a Pilot Light Works
The pilot light is a small flame that is always lit inside your gas water heater. It allows for on-demand hot water without needing matches or a lighter to manually light the burner every time.
Its main purpose is to ignite the main gas burner whenever more heat is needed to raise the temperature of the water in the tank.
The pilot assembly consists of the pilot nozzle which sustains the flame and the thermocouple which acts as a heat sensor. As long as the pilot light stays on, the thermocouple sends a signal to the gas control valve to keep the gas supply open. If the pilot goes out, this cuts off all gas flow for safety reasons.
It is crucial that the pilot light remains constantly lit. If allowed to cool, the thermocouple would shut off the gas. This safety mechanism prevents gas leaks if the pilot goes out unexpectedly.
The small flame not only ignites the burner when required but slightly warms the thermocouple at all times.
By understanding the pilot light’s function, you can better monitor and maintain your gas water heater’s operation. Troubleshoot any pilot or burner issues promptly to guarantee hot water whenever you need it.
Manual vs Electronic Ignition Systems
Gas water heaters utilise either a manual or electronic ignition system to light the pilot. With a manual ignition, you must hold an external flame source such as a long fireplace lighter to the pilot nozzle. This allows gas flow and ignition when the gas control valve is turned to Pilot.
Electronic ignition water heaters instead have an igniter button, usually red in colour, near the gas valve. When pressed, this creates a spark electrode that ignites the gas to light the pilot without needing an open flame. An indicator light on the valve assembly signals when the pilot is lit.
To tell which system you have, check your water heater for the presence of an igniter button and electrode wiring leading to the pilot assembly. Manual ignition heaters will simply have a pilot nozzle and thermocouple instead. While the process differs, safety protocols remain paramount when relighting pilots on all models.
Turning Off the Gas Supply
An essential preliminary step when relighting your water heater’s pilot is to turn off the gas supply.
This prevents any raw gas from flowing out while the pilot light is unlit. Locate the gas control knob, typically near the base of the tank or access panel. Rotate it clockwise to the ‘Off’ or ‘Pilot’ position until it stops.
Visually confirm that the pilot light is off once the gas supply has been shut off. Note that you may hear a slight hiss of residual gas escaping the lines as the pressure equalises. Proceed with relighting only once this sound stops, indicating all gas flow has ceased.
This guarantees no leaked gas accumulates while the pilot is relit.
Turning off the gas supply is crucial to safely controlling fuel flow before lighting the pilot. While it may seem tedious, taking this precaution helps mitigate the risk of accidents around gas appliances. Allowing gas to flow freely with no ignition source is extremely hazardous, so make sure the supply is securely turned off.
Accessing the Pilot Light
To access the pilot light, you will need to remove the metal access panel on the lower front of the water heater. This panel is usually held in place by screws or clasps. Set the panel aside carefully after removing it.
Refer to your owner’s manual for any specific warnings or instructions on removing this panel. On some models, you may need to disconnect wiring harnesses or piping connected to the gas control valve assembly before fully accessing the pilot area.
Take care not to bend or apply too much force on any gas piping when working around the valve region. Once able to view the pilot nozzle and thermocouple, visually inspect for any obstructions or dirt buildup before attempting to relight.
If unable to remove the access panel by hand, check for any seized screws or corrosion on the edges. Apply penetrating oil or lubricant to free the panel. Call for assistance if unable to remove it after multiple careful attempts.
Setting the Gas Control Knob
Once the gas supply is confirmed off and you have access to the pilot assembly, you can set the gas control knob to enable gas flow. Locate the knob on the gas control valve and turn it counter-clockwise to the ‘Pilot’ position. You may feel some resistance at first as it unseats.
Setting the knob to ‘Pilot’ configures the gas valve to permit fuel flow only to the pilot light nozzle. This allows you to safely light pilot while keeping the main burner off. Turning the knob fully counterclockwise will eventually lead to gas flowing to the main burner once lit.
With the knob now set to the pilot position, you can proceed to relight the small flame using either the electronic igniter or manual lighter, depending on your water heater model. It typically takes holding the knob down for 30-60 seconds post-ignition before releasing to test if the pilot stays lit.
Manipulating the gas control properly is key to managing the fuel supply during relight. Exercise caution when turning the valve to avoid damage. With some finesse, you’ll have the pilot going and hot water flowing in no time.
Igniting a Manual Pilot
To manually light your water heater’s pilot, first ensure you have turned the gas control knob to the 'Pilot’ position as previously described. Hold an extended lighter or electronic lighter wand to the pilot nozzle, then press and hold down the gas control knob. Keep the knob depressed for 30-60 seconds while holding the flame to the nozzle until the pilot ignites and remains lit after removing the lighter.
This will allow gas flow to the pilot light. The flame should sustain itself on the gas now flowing to it.
Keep holding the gas control knob down for at least 60-90 seconds after lighting the pilot. Keep holding the gas control knob down for at least 60-90 seconds after lighting the pilot. Once the pilot remains lit, you can proceed to carefully turn the knob to your desired hot water temperature setting.
Release the knob and check that the pilot stays lit. If not, repeat the relighting process, holding the knob down longer after ignition.
With some patience while pressing the knob during ignition, manually relight your water heater’s pilot is straightforward. Just be sure to adhere to all safety measures first and exercise caution when introducing an open flame near any gas appliances.
Using an Electronic Igniter
If your water heater has an electronic ignition system, relighting the pilot will be more straightforward. You should hear a clicking sound as the electric spark ignites the gas to light the pilot flame.
Locate the red igniter button near the gas control valve. Press and hold this button down for 5 seconds.
Continue holding the igniter button for 60-90 seconds once lit to allow the thermocouple to heat up sufficiently.
The pilot should remain burning. Release the button and check that the flame stays on. If not, repeat the ignition process, holding down longer.
The presence of an indicator light near the electronic igniter button signals when the pilot is lit. This light will typically be green when powered and on. It makes monitoring pilot status much easier without needing to visually inspect the small flame.
With the pilot now relit, turn the gas control knob to your desired hot water temperature setting. Take care not to extinguish the delicate flame. Electronic ignition removes the need for matches and lighters to relight the pilot.
Testing the Pilot Flame
After igniting the pilot light, it is crucial to test that the small flame remains lit before leaving the area. Keep the gas control knob depressed for at least 60-90 seconds, then release your hold on the knob. Visually inspect that the pilot light continues to burn steadily.
Water heaters with an electronic igniter will have an indicator light that confirms pilot status. Check that this light remains on without flickering after releasing the igniter button. If equipped, the thermocouple sensor will also keep the gas valve open as long as it detects heat from the pilot flame.
If the flame goes out promptly after releasing the gas control knob or button, there may be residual air in the gas line that needs purging. Repeat the lighting process several times until the pilot flame remains lit. Each cycle purges more air until a constant gas flow is achieved.
Testing the newly-lit pilot light provides assurance that the water heater has been properly and safely relit. You can then set the main burner to fire whenever hot water is required.
Troubleshooting Pilot Light Issues
There are a few common issues that can cause a pilot light to go out or fail to stay lit after relighting on a gas water heater:
- Strong drafts in the installation area that blow out the pilot flame.
- Dirt or debris clogging the small pilot light nozzle, preventing gas flow.
- A faulty thermocouple failing to sense the pilot flame and keep the gas valve open.
- Moisture buildup or spider web fouling the thermocouple sensor.
- A bent or corroded electrode tip failing to spark and ignite the gas.
To troubleshoot how relight, check for drafts or vents near the water heater that could extinguish the flame.
Clean any dirt from the pilot nozzle using compressed air. Ensure wiring is intact between the thermocouple, electrode and gas valve. Replace damaged parts like the thermocouple or electrode. Clean any dirt from the pilot nozzle using compressed air.
When to Call a Professional
It is best to call our experienced team at Bossley Park Plumbing if you continue having difficulties getting your water heater’s pilot light to stay lit after multiple relight attempts. We specialise in servicing all makes and models of residential and commercial gas water heaters in the Bossley Park area.
Specifically, contact our 24/7 plumbing services at 1300 349 338 or jobs@bossleyparkplumbingservices.com.au if:
- You smell gas and are unable to safely turn off the supply
- The pilot light repeatedly goes out after lighting
- There are problems with your electronic igniter system
- You suspect issues with the thermocouple sensor
- There are damaged wires, piping or gas control valve components
Our licenced technicians can troubleshoot any ongoing pilot light and water heater problems. We also offer maintenance checks and upgrades to newer energy-efficient models. Book an appointment online or call anytime for a consultation.